Showing posts with label 5 ingredients or less. Show all posts

Friday, November 15, 2019

Cooking Show: Day-After Thanksgiving Recipes!


With Thanksgiving right around the corner, it wasn't difficult to come up with a theme for our recent cooking show.

Instead of preparing traditional recipes, however, I decided to focus on leftovers.

I need to confess that I actually roast a pre-Thanksgiving turkey, and perhaps make an extra batch of mashed potatoes and cranberry sauce as well, ensuring that there will be post-Thanksgiving leftovers...can you relate?  

I find it helpful to have a fridge full of leftovers because it makes meal-planning a cinch when I'm in the midst of my decorating frenzy during the days after Thanksgiving...

I was assisted by my friend, Maureen.  We made batches of No-Stress Cranberry Sauce and Make-Ahead Gravy.  This is a cooking show after all.  We felt the need to actually cook something before we started assembling our leftovers!

If you've never made homemade cranberry sauce, please give it a try!  I would usually strongly suggest making gravy using pan drippings, but a recipe like this one that you can make ahead before you even put the bird into the oven can certainly come in handy!

(Click on the highlighted titles to be taken to the recipes.)


One more phyllo tart recipe to add to the repertoire. FOUR ingredients!!! 

Great way to use your leftover cranberry sauce! And so easy to whip up a batch to fortify yourself during your post-Thanksgiving decorating frenzy (hint-hint).


If you're wondering what to do with leftover mashed potatoes, look no further!  Soooo good.  

Simply reheat your mashed potatoes and add your favorite toppings!


Fill them up, give them a quick sear, dip them into gravy.  A one-stop-shopping recipe for Thanksgiving leftovers!

Thank you for following along.  I hope that you have a very Happy Thanksgiving...

...and a very happy day after Thanksgiving as well!

Friday, September 23, 2016

Oven-Roasted Spiced Sweet Potatoes

If you're looking for an easy recipe for a spectacular side dish, look no further!!


I'll sum up this recipe for you in one sentence: wash, peel and dice a sweet potato, stir with olive oil, cumin and paprika and bake for 25 minutes at 425 degrees.

How do they taste, you ask?

Out of this world. To-die-for. 

Yes, they are that good.

Don't just take my word for it.  Make some today!!


Today's Playlist
  • "The Girl Got Hot"...Weezer
  • "Ball and Biscuit"...The White Stripes
  • "Last Night"...The Strokes
  • "Joker and the Thief"...Wolfmother
  • "Where Is My Mind"...Pixies


Oven-Roasted Spiced Sweet Potatoes (4 servings)

  • 1 large or 2 small sweet potatoes, cut into 3/4" cubes
  • 2 tablespoons olive oil
  • 1 teaspoon cumin
  • 1 teaspoon paprika
  • 1 teaspoon salt


Gather your ingredients.  Preheat your oven to 425 degrees Fahrenheit.  Line a large (10" x 15") baking sheet with parchment.

Wash and peel your sweet potato.  Cut it into 3/4-inch cubes.  You should have about 3 cups of cubes.


Place the cubed sweet potatoes into a medium bowl and drizzle with the olive oil.  Stir to coat the potatoes with the oil.

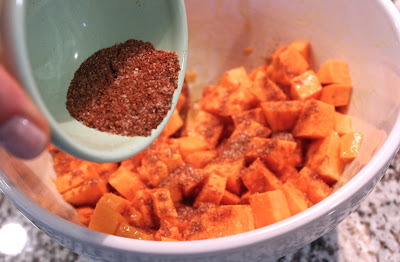
Combine the cumin, paprika and salt in a small bowl.  Sprinkle over the sweet potatoes.  Stir to coat the potatoes with the spices.

Spread the potatoes into a single layer on your parchment-lined baking sheet.  Roast the potatoes for 25 minutes, until tender and easily pierced with a toothpick.


 Enjoy.

Tuesday, March 29, 2016

Sliced Pear with Prosciutto and Honey

Are you craving a salty-sweet snack?


If you have one pear, one slice of prosciutto and a teaspoon of honey on hand, you can whip up a tray of these in a jiffy!

Today's Playlist

  • "No Rain"...Blind Melon
  • "I'm Shakin'"...Jack White
  • "Dani California"...Red Hot Chili Peppers
  • "Dirty Little Secret"...All-American Rejects
  • "Riptide"...Vance Joy
  • "Everybody Talks"...Neon Trees

Sliced Pear with Prosciutto and Honey
  • 1 medium-sized pear (I used an anjou pear, use what you like)
  • 1 paper-thin slice of prosciutto
  • 1 teaspoon honey
Note: the prosciutto may be baked in advance.  To prevent the pear from turning brown, however, it should not be sliced too far in advance of serving!


Gather your ingredients.

Preheat your oven to 350 degrees.  Line a baking sheet with parchment paper, and place the prosciutto onto the parchment.  When your oven is ready, bake the prosciutto until crisp (about 10 minutes).

Allow to cool for about 5 minutes.

While you're waiting for the prosciutto to cool down, slice your pear into slices approximately 1/4-inch thick.  Discard the two end slices.

Stack the slices and slice through the middle.

Use a paring knife to remove any seeds/discoloration from the center of the slices.

Arrange the slices onto a serving platter.

Place the honey into a small bowl or dish and microwave on HIGH for 10 seconds.  This will cut down on the viscosity of the honey and make it easier to brush onto the pears.

Using a pastry brush, lightly coat the surface of the slices with honey.  

Brushing the pears with honey helps the crumbled prosciutto to stick to the slices and not fall off and go down the front of your shirt when you bite into the pear.

Not that I would know anything about that.

Crumble the slice of prosciutto over the pear slices and serve immediately.

 Enjoy.

Tuesday, June 30, 2015

Star-Spangled Cocktail

I decided to experiment with Blue Curacao today.

Saturday is the 4th of July, and I thought I'd come up with a blue cocktail.


Success!  (I spy Clyde behind the chair!)

Thursday, March 19, 2015

Shortbread Thumbprint Cookies

Five ingredients.  That's all you need.  Butter, sugar, flour, extract and jam.

And I'm going to guess that these are ingredients that you already have in your pantry!

What are you waiting for?


Wednesday, July 23, 2014

Strawberry Agua Fresca

This could have been such a quick and easy post.

Three ingredients!  Plus water.  It takes about ten minutes to make.  I could have written this blog post in record time.

But then it sort of turned into a circular tale.  (If you've ever read the children's book If You Give A Mouse A Cookie, you know what I'm talking about.)

It all started when I thought I'd make a pitcher of agua fresca.

Which made me think of Mexico.  Circa 1986.

Which made me wonder if I had taken any pictures of agua fresca during my long-ago Mexican vacations.

Which made me dig out a couple of old photo albums filled with pictures from vacations to Cancun and Acapulco.

No pictures of agua fresca, but there was this picture of my poolside drink served in a watermelon.


Which made me think of the abundance of tropical fruit that my friends and I ate on that trip to Cancun.  Imagine our surprise on our first night there, at dinner, when our waiter placed a hollowed-out pineapple loaded with fruit in front of each of us.  It was simply described as a "fruit cup" on the appetizer menu.

Which made me think of how much fun that trip to Cancun was.  So much fun that I wanted to go back to Mexico for my honeymoon the following year, to Acapulco.

Thinking of Acapulco made me think of the goofy little Mexican teddy bear I won shooting hoops.

Which made me think about how sweaty I was shooting hoops in Mexico on my honeymoon.

Which reminded me that I want to make a pitcher of agua fresca.

Sunday, January 12, 2014

Berries With Vanilla Glaze--A Pick-Me-Up for Winter Doldrums

Winter, be gone!

If only it were that easy.

Even though it has been pouring rain, the sixty-degree temps of the last couple of days brought a bit of spring fever with them.


Clyde has spring fever, too!

  I settled for a bowl of berries instead, doctored up with a vanilla glaze.  I know, I know...berries are not in season.  Which is exactly why I want them.  Because if they were in season, I wouldn't need them to cure my spring fever, because it would no longer be winter and I wouldn't have spring fever.  Are you following my logic?

This recipe is so simple, and so good!  At first bite, my girls declared, "This is a keeper!" "Make this again!" And I will, anytime I want to chase the winter doldrums away.

Sunday, January 27, 2013

Grilled Molasses-Marinated Flank Steak

Caitie and Sean went back to school last week.  It was wonderful to have everyone under one roof, if only for a month.

Boy, do I miss them when they aren't here.

 It was nice that they were able to spend significant time with Clyde while he is still a puppy.  I mean, it would be almost cruel for us to have a new puppy if they didn't get a chance to enjoy his puppyhood.  Is that even a word?  Puppyness.  Puppydom.  Hmmm.  I think you know the point I'm trying to make.
His puppy-ish-ness is fading fast.  He's 40 pounds and TODAY he finally decided he can walk down stairs by himself.

Yes, that's right, I've been carrying him.  Downstairs every morning.  I consider myself quite strong and capable, but as I'm approaching the end of my fifth decade I'd be lying if I said my bones aren't a little creaky when I wake up in the morning.  

One of the few good things I can say about the freezing temperatures today is that I am certain that all of my neighbors had their windows closed because of the cold, so they couldn't hear me enthusiastically praising him as he ran down the steps of our deck each time I took him out today.  "Yay!  Look at you! Good boy, going down the stairs all by yourself! Way to go!"  Of course, if they happened to be looking out of their windows, they might have been wondering why I was clapping and raising my arms in triumph.

Anyhow......I got the inspiration for today's recipe as I was making a batch of  Snow-Capped Molasses Cookies last week.  As I was pouring the molasses I was thinking to myself that it would make a nice marinade.  So I decided to give it a try, and it's a keeper!

Friday, August 5, 2011

Homemade Lemon Ice Cream

Lately, I've been making a lot of meals that I've already blogged about.  Things that are easy to prepare in the summer heat.


But there have been a few minor side trips, one of which entailed pulling out the ice cream maker I haven't used in almost two years.

Hello, old friend!!

I don't know why I didn't make ice cream last summer.  I guess I was just lazy.  Because this is probably the easiest-to-use ice cream maker in existence. 

I speak from experience.  I used to have a much larger ice cream maker, that had lots of complicated parts, and then when I finally figured out how to put the thing together, operating it required lots of salt and ice cubes.  As in, surround the churning tub with layers of salt and ice cubes, and be sure to keep an eye on it because the ice will melt and you will have to add more.  It was a mess.  Clean up was not fun.

I used it quite a bit when my kids were younger and making ice cream with them was a "fun thing to do."  Moms of young children are always looking for "fun things to do" that take up lots of what seemed like endless free time.

And then the kids got older and not only was there a lot less free time, but using and cleaning the inconvenient ice cream maker was no longer fun!  At least not in our house.

This ice cream maker does not require salt or ice cubes.  There are only four parts to it: the motorized bottom, the tub, the paddle and the cover.  Well, I guess there's five if you count the extra tub that it came with.

All you do is keep one tub in the freezer at all times so that the magical filling that is sealed inside is frozen and ready to go on a moment's notice. 

The tub I used today has been sitting in my freezer (my basement freezer, where I store all the overflow that doesn't fit in my kitchen freezer) for two years.  It was beyond ready.

I don't have a playlist for you today, because the ice cream machine is so loud that after I combined the ingredients, poured them in and turned the machine on, all the music was drowned out.  Okay, I did listen to Weezer's "Buddy Holly" while I prepped the lemon and mixed it into the other three ingredients.  So consider this recipe a one-song-on-the-playlist kind of recipe.