
I very rarely cook alone. My trusty sidekicks are usually nearby.

Clyde is usually to my left.

And Gus is usually directly behind me.

Gus is usually sitting at attention. Clyde is usually lying down.
If they could speak, I imagine they would say something like this:

 Or........


 When the chili has finished simmering, add the spinach.
 Stir in the cream. 1/4 cup is not a lot of cream, but it helps to put the white into our white chili.
 Sprinkle in some paprika. Stir it all up and serve immediately.
 Don't forget to sprinkle some monterey jack or cheddar jack on top.

If they could speak, I imagine they would say something like this:
Gus:
I am READY. I've got this COVERED. You drop something, I am ON IT. Don't worry, I may even catch it before it hits the floor, before you even know you've dropped it.
Clyde:
Dude! Chillax!

It's a different story when he's out playing in the yard. Clyde always
comes to life when there's room to run around. Yee-haw!


maybe not. He's not one to pass up an opportunity to relax and chill.
Today's recipe, White Chili, requires a bit of prep work in advance. I went through my blog archive, and I can't believe I've made it this far into blogging without posting a recipe that uses roasted garlic! Since you will need roasted garlic for this chili, I'll also give you those simple instructions so you can roast your garlic ahead of time.
Today's Playlist
- "She's A Genius"...Jet
- "Re-Education"...Rise Against
- "Sweet Child O' Mine"...Guns N' Roses
- "Under The Bridge"...Red Hot Chili Peppers
- "Let Me Go"...Cake
- "In One Ear"...Cage The Elephant
- "Buddy Holly"...Weezer
- "Seven Nation Army"...The White Stripes
- "Time After Time"...Quietdrive
- "You Want To Be With Me"...Crosby Loggins
- "Sorry She's Mine"...The Small Faces
Roasted Garlic
- Whole, unpeeled heads of garlic
- Olive oil
I intentionally did not give you ingredient amounts. Although you only need one whole head for this recipe, it takes just as much time to prepare and roast 10 heads as it does for one. Your call; if you think you have a need for more roasted garlic in the near future, roast as much as you like! My rule of thumb would be one tablespoon of olive oil for every 2 heads of garlic.
Gather your ingredients, which would be olive oil and whole garlic heads. I neglected to take a picture, but I think you will survive.
Preheat your oven to 400 degrees.

Lop off the tops of the garlic heads, so that the individual cloves are exposed.

Drizzle the olive oil into your baking pan.

Place the garlic heads with their cut side down into the oil, and swirl them around so that the tops get coated with oil.

Flip them right-side up.
Cover the pan with aluminum foil and bake for 35 to 40 minutes, or until the cloves are softened.

Roasting really mellows the flavor.

Pull or squeeze the garlic cloves out of their skin using your fingers or a small fork. The cloves should separate from the skin quickly and easily.
Store them in a zip-lock bag in your refrigerator until needed. I would suggest roasting an extra head or two and keeping it on hand to add to pasta recipes, potatoes or just to spread on warm, crusty bread.
White Chili (about 6 servings)
- 1 tablespoon olive oil
- 1/2 cup chopped shallots
- 3 red chile peppers
- 1 clove garlic, crushed
- 1/4 cup flour
- 1 cup white wine
- 6 1/2 cups low-sodium chicken broth, divided
- 1 1/2 lbs boneless chicken, cooked and shredded
- 2 teaspoons chili powder
- pinch cayenne pepper
- 1 to 2 cans cannellini beans, undrained
- 6 cloves roasted garlic
- 3 cups fresh baby spinach, coarsely chopped
- 1/2 teaspoon paprika
- 1/4 cup heavy cream
- 1 cup grated cheddar jack or monterey jack cheese

Gather your ingredients.
You will need to cook and shred your chicken in advance; 3 to 4 boneless breasts brushed with olive oil roasted at 375 degrees for 18 to 20 minutes should do it. If you would like step-by-step directions with pictures you can click here to be taken to my post for Cheesy Chicken Quesadillas with Spinach, and you can find the directions for roasting chicken breasts there.
Or you could always buy yourself a rotisserie chicken and save yourself the cooking time. Your call.
Turn on your broiler.

Place your chiles on a foil-lined broiler pan. You are going to broil them until they are charred on all sides, turning every 2 minutes, for a total of 6 minutes. Put them under the broiler and set the timer for 2 minutes.

Chop your shallots in the meantime, while your chiles are broiling.
Heat the tablespoon of olive oil in a large (6 quart) saucepan over medium-low heat.
Be sure to turn your chiles and set the timer for another 2 minutes.

Add the chopped shallots to the saucepan with the olive oil and stir. Keep the heat at medium-low, you want the shallots to caramelize slowly, not to cook quickly and get crispy. It will take about 15 minutes for them to caramelize. Stir occasionally.
Turn the chiles one last time and set the timer for 2 more minutes.

Here they are, all done.

The skin is already starting to separate, but to speed it along, place the chiles into a bowl,

and cover with plastic wrap.
Continue to stir your shallots.

After a few minutes, when your peppers have cooled, remove them from the bowl and place them onto a cutting board. You can see that the skin peels away very easily.

Pull the skin right up to the top of the pepper and cut off the top of the pepper. Discard.

Open the pepper up so that it lies flat. Remove all of the seeds and any membranes that you can peel away.

Repeat for all of the peppers, and then chop them into 1/2-inch pieces.

Your shallots should be nicely caramelized by now. Crush the clove of garlic directly into the pan. Stir for a minute, just until it's softened.

Add the 1/4 cup of flour.

Stir to absorb the oil. It will seem like it's too dry to stir, and the chopped shallots will start to clump up. This is okay!
The flour will absorb the oil, and then it will serve to thicken the chili a bit as you add the remaining ingredients.

Pour in the wine. Increase the heat to high.

Let the wine works its magic, while you stir and loosen all of the brown bits that may be stuck to the pan.

Stir in the chopped chiles.

Add 6 cups of the chicken broth (you will reserve the final 1/2 cup of broth to use when you puree the roasted garlic).

Stir in the shredded chicken.

Add the chili powder and a pinch of cayenne.

Add the cannellini beans. Do not drain the liquid from the can first. Add it all! I only use one can of beans, but I am told that some people believe that chili is all about the beans. If you are one of those people, feel free to use more beans. Add another can of beans if it makes you happy!
Adjust the heat to a simmer.

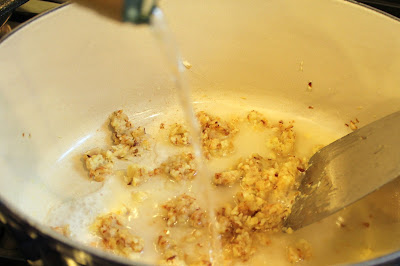
While the chili simmers, put the remaining 1/2 cup of chicken broth into a blender or food processor.

Add the roasted garlic cloves. Blend or process until the garlic is pureed.

Add the garlic puree into the chili.
Allow your chili to simmer, uncovered, for about 30 minutes, or until it thickens a bit.

While the chili simmers, coarsely chop your spinach. To do this, I just hold my knife at a 45-degree angle and chop from left to right...

then hold it 45-degrees in the other direction and chop from right to left.
My advice would be to hold the knife however you like and chop in any direction you want. As long as the spinach is chopped, you're good to go.


Enjoy!
I love roasted garlic and actually eat it everyday. This chili sounds like the perfect way to transition from summer to fall. And your dogs are adorable!
ReplyDeleteI so want to hug Gus and Clyde! You've got the cutest cooking buddies ever.
ReplyDeleteYou've got me hungry for white chili now. Great sounding recipe. I think I can smell the garlic roasting, yum! :) Pam
The chili looks wonderful! Thanks for the roasted garlic how to... I should try this:)
ReplyDelete