Friday, December 16, 2016

Cooking Show: Party-Worthy Recipes


I would describe the recipes we prepared on our latest episode of the cooking show as party-worthy dishes to fill in your menu during this busy season.

If you're looking to add another cocktail, appetizer, salad or sweet treat to your soirée, we've got you covered.

Click on the titles to be taken to the printable recipes!

SOOOOOOO GOOD!!  

Creamy, chocolatey, pepperminty...just shake it and serve it.  Everyone who tasted this exclaimed YUM!!


Another recipe that is so easy to make!   Two minutes to melt ingredients in your microwave, then stir and spread into a baking pan and chill.


Another quick and easy recipe.  Buy already-made frozen phyllo tarts, fill them with pesto, chopped tomato and mozzarella and bake until the cheese melts.


Very easy to prepare!  


Okay, up until this point all of the recipes have been of the easy, throw-all-of-the-ingredients-together type of recipes.

These mini-croissants are still easy to make!  They just take a bit more prep...but they are so worth it!!

And finally...


Because.  Just because this is so good!   

Not sure how close it is to the real recipe, but these shrimp are addicting. The first time I made them, my husband remarked, "These are really good! I don't care for seafood, but I've already eaten five of them and there are more to follow..."

We skewered the shrimp with cocktail toothpicks to serve as an appetizer, but they would be fabulous in tacos or quesadillas. Or make a double batch of the sauce, thin it down a bit and serve with pasta!

Saturday, December 3, 2016

Cooking Show: Deep-Frying vs. Air Frying!

On our latest cooking show, we decided to prepare a few recipes and compare cooking methods.  Deep-fried versus air fried?  Which tastes better?  Is there truly a difference?

My friend, Trish, has an unabashed love of deep-fried food so it only seemed fair that she be the judge!  We decided on a menu of onion strings, chicken tenderloins, and apple pie egg rolls.

(Click on the following titles to be taken to the printable recipes.)


As we were waiting for the oil to heat up, we made a pitcher of Cranberry-Apple Sangria.

Once we got the oil in the deep fryer at our desired temperature we were ready to go.


First course: Onion Strings.  

The air-fried onion strings are on the left and the oil-fried ones are on the right.  

The air friend ones were crispy, but retained a powdery coating of flour. They tasted okay, but the flour residue was not a pleasant effect.  

The oil-fried onion strings only took 2 minutes per batch, the air-fried ones took about 4 1/2 minutes. Due to the longer cooking time required (and not being able to place as many onion strings per batch) in the air fryer, we were able to deep fry about triple the amount in the same amount of time.

Trish and I agreed that the oil-fried onion strings were the best, hands-down.

 Next: Crispy Chicken Tenderloins with honey mustard dip.

Similar to the onion strings, the air-fried chicken took about twice as long to cook as the deep-fried chicken (14 minutes for the air-fried versus 6 to 7 minutes for the deep-fried).

However, Trish and I both agreed that they both tasted fabulous!  Both were crispy and very flavorful.  The only drawback was the time difference...we were able to prepare two batches of the deep-fried tenderloins in less time than it took for one batch in the air fryer, AND the air fryer does not hold as many per batch.  If I were preparing these for my family of five, I would need to make three batches in the air fryer, or two batches in the deep fryer--45 minutes vs. 15 minutes.

Trish and I both concluded that if we were preparing one batch, for two servings, the air fryer wins.  The additional half-hour needed for three batches, while keeping the early batches warm in the oven (and hope that they don't dry out!) makes the air fryer a very inconvenient choice for more than two servings.


The deep-fried egg rolls are on the left in the above photo, the air-fried ones are on the right.

Can you guess which ones were the winner of the taste test?  I will tell you this...the winner was so good that I'm not even going to bother you with the boring analysis details.  


I'll just say that we cut one of each type of egg roll in half, and our plan was that I would try the air-fried egg roll as Trish tried the deep-fried one, and then we would switch and try the remaining half of the other egg roll which we hadn't yet sampled.  As I was attempting to switch halves, my sweet, lovely, mild-mannered friend showed a bit of food aggression!  She wanted it all to herself.  

The deep-fried one was absolutely delicious, with a perfect, flaky-yet-chewy crust...the air-fried one had a dry, tasteless, crackly crust reminiscent of a saltine.  Trish and I both agreed: when it comes to egg roll apple pies, air frying is a waste of time!


Wednesday, November 9, 2016

Cooking Show Featuring Donna's Cakes!

We recently filmed a special episode of the cooking show.

The fabulous Donna Grandy, from Donna's Cakes joined me in the studio (a first!  All previous shows were filmed in my kitchen).  We had a very enthusiastic studio audience, all fans of Donna's Cakes!

During the past two weeks, I have edited/rewritten/deleted dozens of attempts to write this blogpost. How can I possibly convey through words how spectacular these cakes are?

I decided to blitz you with photos!


Part One--

Donna opened her shop in 1990, which happens to be the same year that my husband and I bought our first home.  Since then, her cakes have always been a part of our family celebrations.  I chose three cakes (one for each of my children!) to represent my own family's Donna's Cakes Archives.  (Yes, that's a thing in this house.)


Donna made this cake in 1995 when my daughter, Erin, was christened.

This cake is a perfect example of why someone who has no idea what they want their cake to look like should go to Donna's Cakes!  I just wanted a christening cake for my daughter.  When I phoned in the order and was asked what I wanted the cake to look like, I think I said something like, "I trust that you could design a better cake than I ever could!" Yes, they could and they did, as this cake proves.


I responded the same way when I ordered this cake in 1999 when Caitie made her first communion.  What do I know about decorating a cake?  Not as much as Donna does, that's for sure.

However, there were times that I ordered cakes when I did have a theme in mind.  Usually, it was for a birthday party, in which case I would bring in a plate or a napkin and ask if a cake could be made to match the theme.

I went to Donna's shop last month to film a short segment for the show, and when we entered her back room I noticed several large boxes full of file folders, alphabetized by subject.  She explained that they have graphics that they use when they decorate cakes, or sometimes a customer will bring in a picture of their own, and they save them all for future reference.

It took me all of 30 seconds to locate the "dinosaur" file and pull out the plate that I brought her TWENTY years ago when I requested a dinosaur cake for my son's birthday!  I doubt that even the latest digital state-of-the-art filing system could have located this plate any quicker.

Here's a picture from 1996 of three-year-old Sean with his dinosaur cake!  Oh, my heart.

Part Two--

Photos of cakes from Donna's Archives.  She sent me dozens of photos to look at.  Here are a few that I think you will enjoy!  You can also head over to Donna's Cakes on Facebook to check out more photos!

Whether you need a cake for an expectant mom,

 someone who loves buffalo wings (yes, they're all made out of frosting),

a Strawberry Shortcake-themed birthday,

the birth of a child,

an elegant wedding,

 (or two!)

 someone who likes a cake as finger-licking-good as their chicken,

or a good-natured, good-tasting poke at longevity---you will find the perfect cake at Donna's.

Part Three--

Filming the show.  Decorating with Donna!


Donna brought all of her own supplies to the studio.  A rainbow assortment of frosting.

Royal icing flowers that she had made in advance.  

She gave a quick demonstration of how to make flowers using different piping tubes.

I told her that I consider it a success if I can frost a cake without getting crumbs into the frosting.  She  instructed me that the key to avoiding that problem is to use a "crumb coat," which is simply a thin layer of frosting to completely cover the cake.  It doesn't matter if you get crumbs into the crumb coat, because you will then frost over it and cover all of the blemishes.

She then demonstrated how to get the frosting to look flat and smooth, by lightly patting it with a paper towel.  The key is to use a flat paper towel, one without an embossed pattern.

And then she proceeded to decorate the cake, making roses out of frosting to complement the royal icing flowers and finishing with a swirly border around the flowers and curlicues around the sides.

 It only took her a few minutes to decorate this cake!

Next, she instructed us how to transfer an image onto a a cake.  She started with this Hello Kitty graphic.

She outlined the borders of the graphic with icing, using a plain pastry tube with a fine tip.  She then flipped the image upside-down onto the cake (or in this case, a board for demonstration purposes), and lightly pressed on it to transfer the image.

She then filled in the image with frosting, using the original graphic as a decorating guide.

Finally, she decorated a cake with a jungle theme.

Before we knew it, a tiger, lion, monkey, elephant, giraffe and alligator were all relaxing on top of this cake!

A few palm trees complete the scene.

The members of the studio audience were all fans of Donna and her cakes, and I think they really enjoyed watching how she creates her designs.

When we finished, everyone in the studio was given a piece of her cake.  One person told me that her family has been ordering Donna's cakes for over 20 years, they love the cakes because they're beautiful but especially because they taste homemade--which is probably the highest compliment that you can give a baker!


Friday, October 21, 2016

Cooking Show: Recipes for Halloween!

Our recent episode of the cooking show featured kid-friendly recipes for Halloween.

Thanks to the assistance of my nine-year-old sous chef, Lily, my counters were covered with spooktacular treats!


We mixed up a cauldron of Eyeball Punch.

Can you spot the eyeball ice cubes?
We then moved onto appetizers, beginning with Pretzel Broomsticks.  This turned out to be Lily's favorite recipe of the night!

Here's the printable recipe.


Next, we made Skeleton Veggies & Dip.  

Lily and I decided which veggies would best represent the bones from shoulders to toes!


Lily diligently went to work shredding string cheese for our Mummy Pizzas!


 Finally, for a sweet treat, we made Frozen Banana Ghost Pops.

Happy Halloween!!

Saturday, October 15, 2016

Pretzel Broomsticks

Boo!

Are you planning a Halloween party?  Or just looking for a fun Halloween-themed snack recipe? A quick to assemble, no cooking required, three-ingredient recipe?

Here you go:

Pretzel Broomsticks!  Made with pretzel sticks, sliced cheese and chives.   

I think they'd make a nice substitution for cheese & crackers at your next Halloween soiree!


Today's Playlist:
  • "Dead"...My Chemical Romance
  • "Perfect Situation"...Weezer
  • "Brown-Eyed Girl"...Lagwagon

Pretzel Broomsticks
  • pretzel sticks
  • sliced cheese (see note)
  • chives
NOTE:  Use a soft deli cheese that doesn't crumble when it's rolled, such as mozzarella or swiss.

                                                         
Gather your ingredients.  I intentionally did not list any amounts in the ingredient list--it depends upon how many people you're serving. Each broomstick requires 1/2 slice of cheese, one pretzel and one chive.

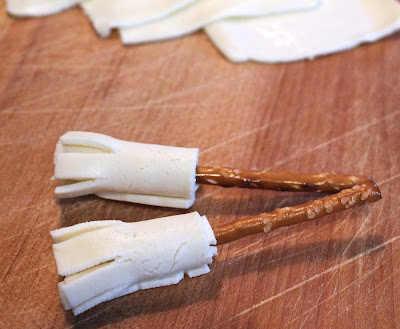
Slice the cheese in half, and cut notches on one side (spaced approximately 1/4-inch apart, about halfway up the width of the slice).

Roll the half-slice of cheese around a pretzel stick, with the notches at the end.

Tie a chive around the top, securing the cheese to the pretzel.  

A single knot should suffice, it's not as if you will be using these snacks to play a tabletop game of broom hockey.  If you are going to use them to play broom hockey, however, I would suggest a double knot.  And perhaps you could use tiny olives as hockey pucks.

Snip off the long ends of the chives with scissors.

Serve immediately.

If you're preparing these in advance, refrigerate (covered with plastic wrap) until serving time.


Enjoy.